


SH Z-Car ZMXB-8 1/8 Buggy - Perfect for conversion! (56k take a break) |

|

|
(#1)
|
|
RC-Monster Mod
Offline
Posts: 5,297
Join Date: Mar 2005
Location: SoCal
|
SH Z-Car ZMXB-8 1/8 Buggy - Perfect for conversion! (56k take a break) -
05.22.2008, 10:25 PM
How many of you have seen this buggy?
http://www.shengines.com/Z-CAR/ABOUTUS_zcar.htm Hobby People, type "z-car" into search, it's the first item It looks pretty good! There's one in stock at the LHS in which I work, and I very much want to buy it. There are a number of features that set it apart from the average 1/8 buggy, I'll try to list as many as possible, that I can see from the pics: -REAR DIFF-MOUNTED DISCK BRAKE -cool non-hex wheel hubs should grab wheels much better and prevent wheel stripping with their wheels (I've stripped 17mm wheels when the wheel nut loosens) -lower pillow-ball on the front, with upper ball joint should allow for some awesome and easy adjustability -nice looking shocks (big bore) and milled out shock towers -chassis has A LOT of material removed, hopefully that makes it nice and light -interesting way of capturing hinge pins (no e-clips!) -rear caster is adjusted by a single plate, looks easier than using little inserts in hinge pin plates The most intriguing thing to me is the first item on the list. RC-Monster Mike and I discussed this feature on buggies. Basically, having the brake there keeps it away from the center diff, so you have more room for a brake servo, and you can also get away with a mini servo. Then, you use the rear brake with a combination of motor brake, so that you still have strong braking, but also have an adjustable rear bias to pitch the rear end into turns. |
|
|

|
|
|
|
|
(#2)
|
|
Guest
Posts: n/a
|
05.22.2008, 10:47 PM
i sow this a few days ago. i did not konw you guys had one.
i think its kinda stupid for only one store to it lol. |
|
|
|
|
|
|
|
(#3)
|
|
RC-Monster Mod
Offline
Posts: 5,297
Join Date: Mar 2005
Location: SoCal
|
05.22.2008, 11:03 PM
It's cuz we're next to the warehouse

|
|
|
|
|
|
|
|
(#4)
|
|
RC-Monster Brushless
Offline
Posts: 2,864
Join Date: Jan 2007
Location: SoCal
|
05.23.2008, 01:09 AM
The Hobby People link doesn't work btw, but it definitely sounds like a pretty sweet buggy. I'll be in Huntington Beach on Saturday, so I'll try to stop by and check it out.
 Is it on display so it can actually be looked at or just a kit in pieces? Is it on display so it can actually be looked at or just a kit in pieces?I am very curious how the brake is attached to the rear diff though. I can't imagine what it even looks like... 
|
|
|
|
|
|
|
|
(#5)
|
|
RC-Monster Mod
Offline
Posts: 5,297
Join Date: Mar 2005
Location: SoCal
|
05.23.2008, 01:21 AM
It's a bunch of parts in a box. Unfortunately I still need to put some funds together before I can make the purchase, but it will be soon
.Link fixed. |
|
|
|
|
|
|
|
(#6)
|
|
RC-Monster Carbon Fiber
Offline
Posts: 252
Join Date: Aug 2006
Location: Estonia, Tallinn
|
05.23.2008, 02:02 AM
Yes its sweet buggy, I tried this on track it handles very good, suspension worked realy good btw shock pistons have special valves on some holes to to turn your shock progressive or regressive. brake solution is interesting and also rear A-arms are interesting too. It sold as KIT
In europe it sold as LRP buggy |
|
|
|
|
|
|
|
(#7)
|
|
RC-Monster Dual Brushless
Offline
Posts: 5,139
Join Date: Sep 2006
|
05.23.2008, 09:30 AM
So who came out with the rear brake idea first, Ofna or SH?
|
 |
|
|
|
|
|
(#8)
|
|
RC-Monster Mod
Offline
Posts: 5,297
Join Date: Mar 2005
Location: SoCal
|
05.23.2008, 03:28 PM
Good question. Ofna released their pics of the Hyper 9 a couple months ago. The SH buggy is sold under LRP in Europe as tom255 noted, and it's probably been out longer than the Hyper 9 pics have.
|
|
|
|
|
|
|
|
(#9)
|
|
RC-Monster Mod
Offline
Posts: 5,297
Join Date: Mar 2005
Location: SoCal
|
05.25.2008, 09:55 PM
So Friday night, not too long after I posted this thread, I realized my NEED to get this buggy (and be the first person to convert one!). So yesterday when working at the LHS I purchased the only one there, and I had to wait until 6:45pm to start building it
 . .Initial impression as soon as the box was opened: "This box smells weird." Then I got around to ripping the parts bags out, trying to see as much as possible as quickly as possible. This was my first 1/8 buggy kit, so as you can imagine I was quite excited! Unfortunately then I looked at the wording on the box and in the instruction manual, and there was much left to be desired: proper translations. But considering that I've had a good deal of experience with RC cars and generally have good intuition the build was not so difficult. First up was building the diffs. This kit includes 500wt. (actually 50wt. shock oil), 1000wt, 3000wt, and 5000wt oils. The instructions specify 3000/3000/1000 F/C/R, but I went with 5000/5000/3000 because I know the diffs will be more likely to unload under brushless power than what "nitro" can dish out. Building the diffs was nothing special, I've built many a 1/8 diff before. Next was the front end. This was where things got interesting. You might have seen 1/8 buggies like the Mugens with pillow ball suspension, and others with vertical ball stud-suspension (I think it might be called pivot ball?). The SH car utilizes both, with a lower pillow ball and a vertical ball stud on top. The pillow balls alone were surprising because they have a hard-anodized aluminum outer sphere and an inner steel core. This design makes them light, yet strong (amazing!). Having the upper vertical ball stud allows for typical camber adjustments with a tie rod, but also allows for the manipulation of the ball stud's height which I am guessing could alter roll center characteristics. Another thing I noticed when building the front end is the plastic of the suspension arms: it feels very sturdy, yet flexible. It just felt reassuring. The rear end build was much unlike anything I've ever built before. For starters, there's a disk brake mounted to the diff case! The design of it is quite simple, and consists of two cylindrical pieces that squeeze the brake disc between them when pressure is applied. Then came attaching the VERY strange suspension arms. The arms have little rubber bushings inserted into them where the hinge pins go through to act as impact absorbers and they should hopefully decrease wear on suspension parts. Finally came attaching everything to the chassis. The front and rear fit onto the chassis perfectly, and without a hitch. The steering servo mount is pretty cool because it is totally separate from the radio tray! There was absolutely no cutting involved to get the steering servo mount in its current condition. Up next is making a motor mount and new plate above the center diff to mount the mini servo (Hitec 5245MG) for the rear brake. And then a battery tray will be made, probably using a spacer to raise it above the level of the dirt guard. Overall, this kit was VERY fun to build because of all the minor things that stood out when I built it. Here are just a few that have not yet been mentioned: -almost all screws are HEX head, and most are self-tapping which means less time to get those screws in or out -only 6 screws were phillips head, including the four 45mm long screws that hold the front and rear gearboxes together, and two more on the front gearbox -little covers for the front upper arms (they hide the turnbuckles) keep the front upper arms straight -front and rear upper mounting points for the aluminum chassis braces have the little rubber bushings in them (impact absorbers), and the upper part of the front chassis brace is secured with a pin and body clip -the hexes are 17mm, but are a star pattern which make them key into the wheels MUCH better than standard 17mm hexes (and these hexes should be compatible with standard 17mm wheels), and this star pattern makes the hexes weigh less -shocks use rubber bushings instead of o-rings, which should provide a better and longer-lasting seal than o-rings -CVDs throughout Total build time was about 7.5hrs for the kit. As you can tell, I am quite impressed with this buggy so far! Now, here are the pics you have been waiting for:  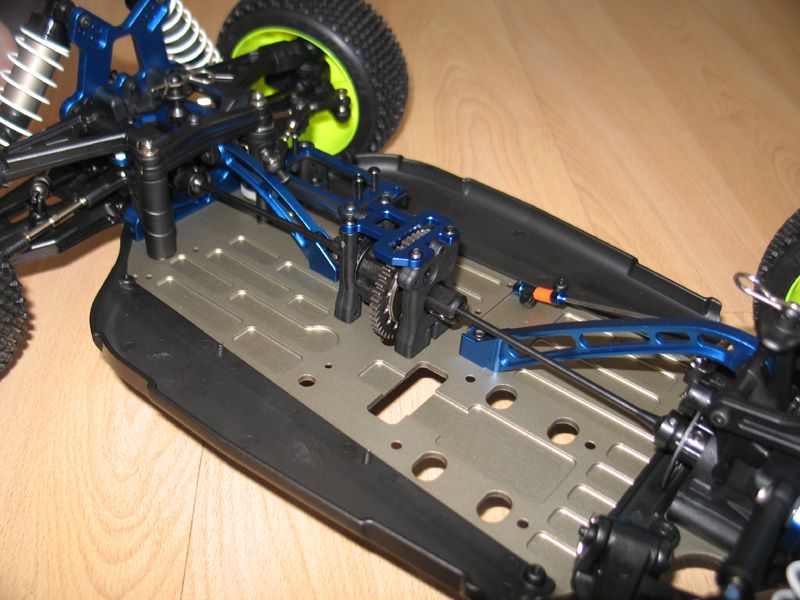 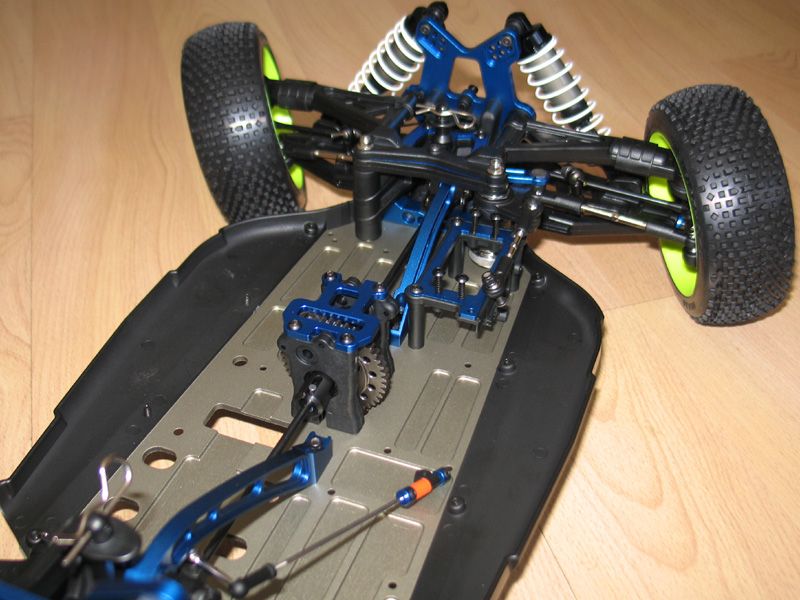 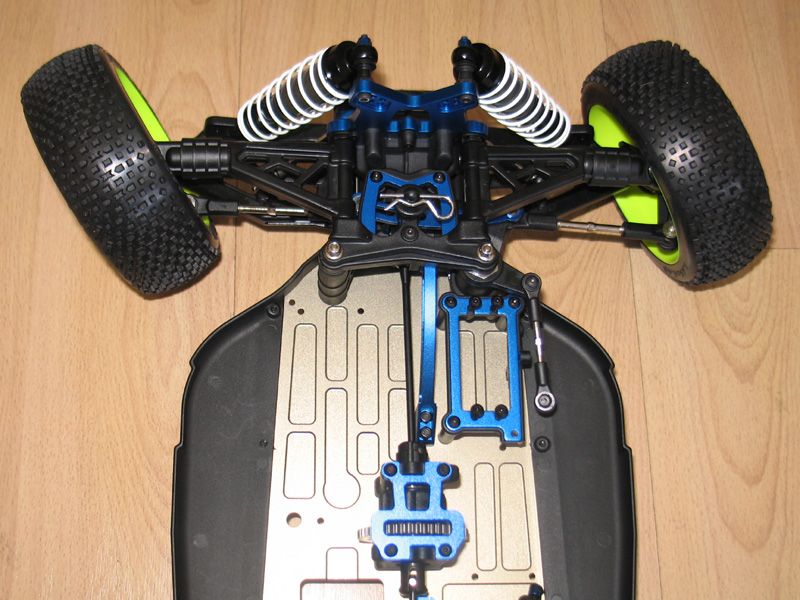 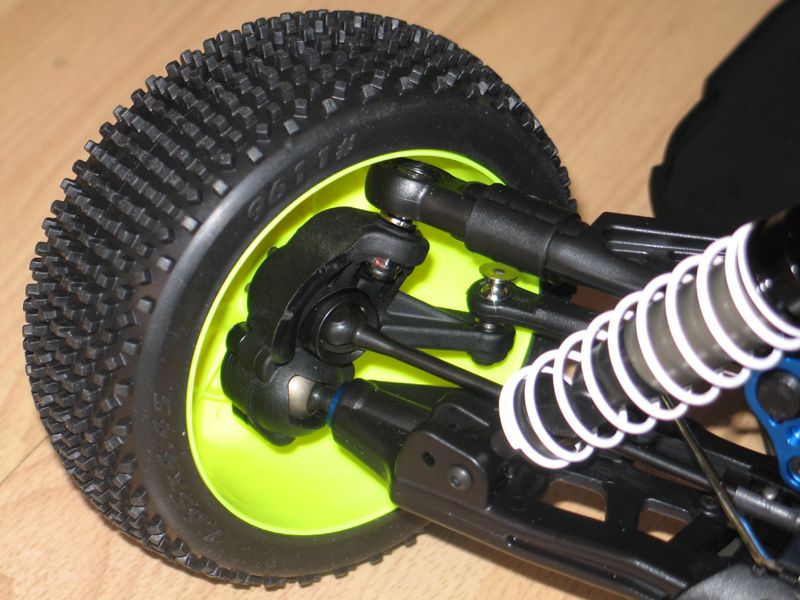  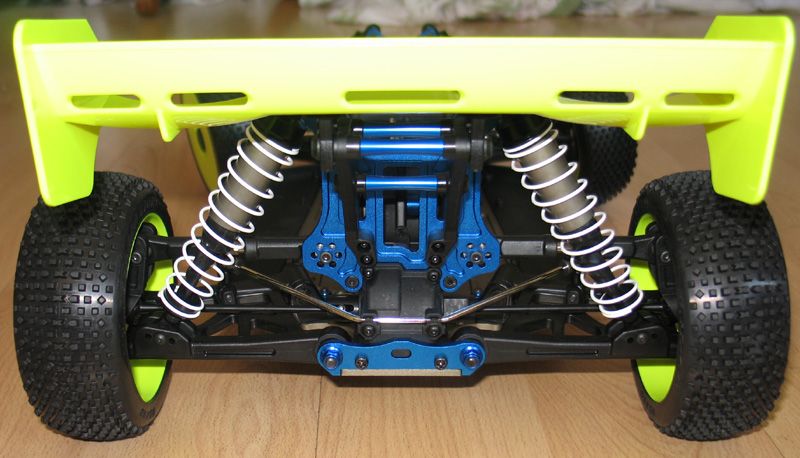 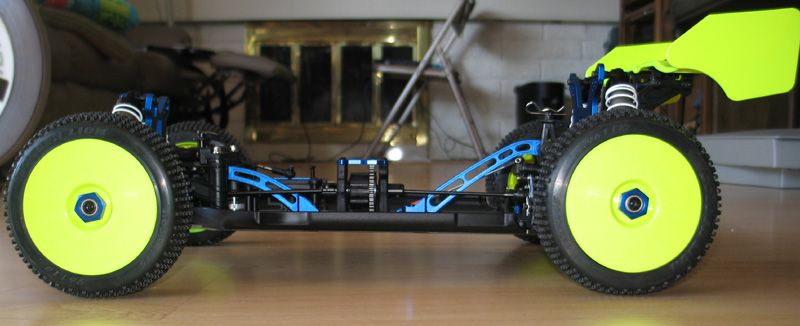
|
|
|
|
|
|
|
|
(#10)
|
|
RC-Monster Dual Brushless
Offline
Posts: 5,139
Join Date: Sep 2006
|
05.25.2008, 10:18 PM
Now that looks awesome. I'm loving the Hybrid rear suspension arm. A mixture of trailing arm and normal arm. Does your LHS have spare parts for it?
|
|
|
|
|
|
|
|
(#11)
|
|
RC-Monster Dual Brushless
Offline
Posts: 4,236
Join Date: Dec 2007
Location: Cape Cod, Mass.
|
05.25.2008, 11:10 PM
Sweet looking kit!!! Hard to believe the build only took 7.5 hrs....wow!! When I built my mbx-5 it took me 15hrs+ (It was my 1st. 1/8 kit) The front suspension is v/interesting and I am curious as to it's durability and performance. All in all a nice looking buggy.
2. MBX-5T 1520, MMM ON 5S 3. MBX-5 ONROAD CONVERSION 1515, MMM ON 5S 4. MRX-3 ON ROAD CONVERSION 1512, MMM ON 6S 5. TEN T 2650 T8, MMP ON 3S |
|
|
|
|
|
|
|
(#12)
|
|
RC-Monster Brushless
Offline
Posts: 2,864
Join Date: Jan 2007
Location: SoCal
|
05.25.2008, 11:20 PM
Very nice looking buggy. The blue and yellow look great together.
Many features I have never seen before on any other buggy. I am looking forward to seeing it in person at the bash... Hopefully you'll bring it. 
|
|
|
|
|
|
|
|
(#13)
|
|||
|
RC-Monster Mod
Offline
Posts: 5,297
Join Date: Mar 2005
Location: SoCal
|
05.25.2008, 11:31 PM
Quote:
Quote:
Quote:
 . But this way my Hyper 8 can be moved over to bashing duties! . But this way my Hyper 8 can be moved over to bashing duties!
|
|||
|
|
|

|
|
|
|
(#15)
|
|
Guest
Posts: n/a
|
05.26.2008, 12:09 AM
hey i have a question. do you know of any motor mount that rcmonster makes that would work for this?
|
|
|
|
 |
«
Previous Thread
|
Next Thread
»
| Currently Active Users Viewing This Thread: 1 (0 members and 1 guests) | |
 Linear Mode

|
|

Powered by vBulletin® Version 3.8.11
Copyright ©2000 - 2026, vBulletin Solutions Inc.
vBulletin Skin developed by: vBStyles.com
Copyright ©2000 - 2026, vBulletin Solutions Inc.
vBulletin Skin developed by: vBStyles.com