


|
|
Single speed tranny w/ lexan cover and motor mount. |

|

|
(#1)
|
|
A Horse's Ass
Offline
Posts: 1,065
Join Date: Oct 2007
Location: Spokane WA
|
Single speed tranny w/ lexan cover and motor mount. -
12.25.2008, 07:05 PM
Here a quick run down of what I did when I was making a single speed 3906 tranny with a lexan cover. The LEDs were an after thought. The pictures will tell most of the story. If you have any questions let me know. Here's my "Gee1" single speed transmission - the prototype. Prototype leaves a larger grey area. Doesn't it?
Well, I got distracted while I was replacing a shaft in the 3906 transmission. I've had the notion to do this for a while. This time something said to do it now. I was going to take the 3/8" lexan and try and make a motor mount that the front of the motor was inset into it. So the pinion didn't need to be so far out on the end of the shaft while using a the revo slipper. Still need to look into doing that. I had a chunk of 3/8" lexan that I could maybe get two of them out off. The motor mount was made out of 1/4" lexan. I copied the mount I had by tracing it out from my G1 on the evo. No creativity there. The 1/4" lexan has some flex to it so I will need to rethink the motor mount or use a thicker piece of lexan. The flex might be fixed with a different design. The pictures are not in order really but they are close and show the work that was done. I started first with the output gear holes. I say holes because I drilled the hole for the shaft and a hole for the bearing to sit in. I found the 12x15 bearing fit just right on the enlarged part of the output shaft. I used a Fostner bit that was the closet to the 15mm size hole I needed. If your not familiar with Fostner bits. They leave a flat bottom to the hole you drill. I then use the dremell to enlage the hole to fit the bearings. If your not familiar with a dremell you need to get out more. LOL Once I was satisified with the output shaft. I then drilled the holes for the input shaft. Doing the output shaft hole first then drilling the second input shaft hole with the case as a template (using a dowel and couple of scews to anchore the output shaft to the case) gave me better odds of the two shafts being aligned straight and hopefull not bind when the gears were installed. The input shaft hole was done like the output hole was. Except I didn't need to drill the hole all the way through the lexan. No harm done. The end of the shaft rides in a bearing there. Is not as watertight as a frogs butt. It's gonna get the job done though. I used the 5x11 bearing for the end of the shaft to sit in. The input shaft took two 5x11x4 bearing to get a good fit. The output shaft used two 12x15x4 bearings. In the end I needed about four shims to get a snug fit for the output shaft. 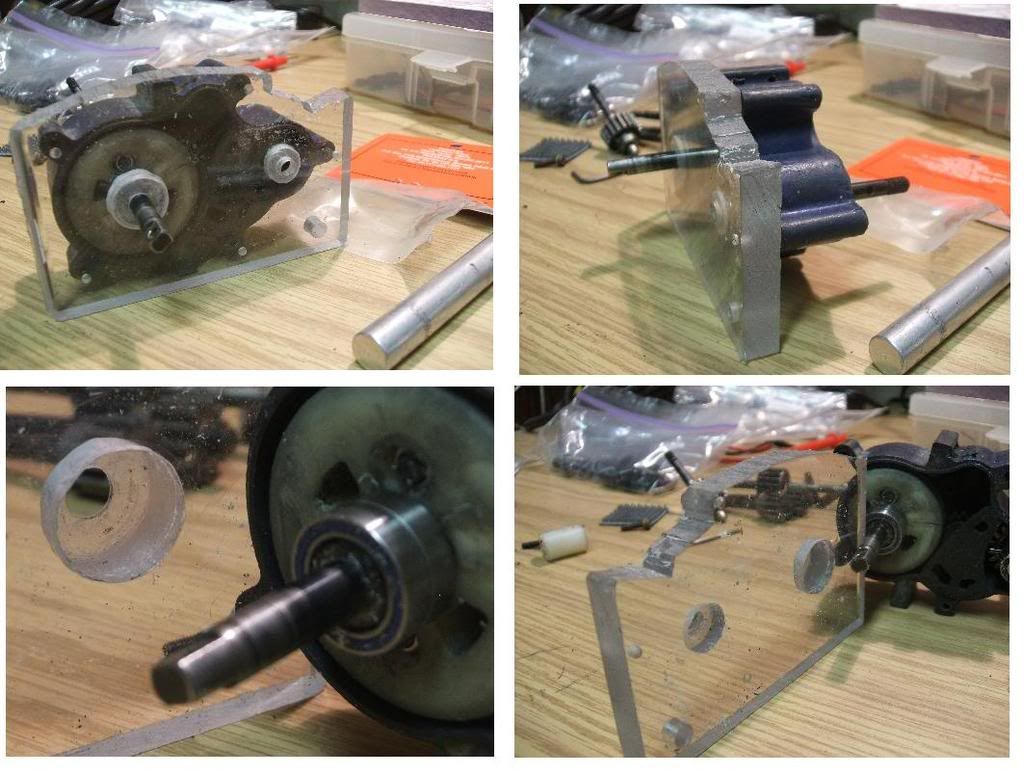 After I did the first two holes. I worked on getting what ever was sitting above the 1/2 case to sit flush with (or slightly below) the lip of the half case. I removed the top half of the idler gear post and a sanded it down a little. For the dog drive to sit flush. I drilled a small indent slightly smaller then the nut I had holding it and the second gear. I took a screw and put in into the nut from the topside of the nut and tapped the nut into the recess I just drilled for it. I used a 3x12 screw to secure the to parts together. Then with the nut and scew recessed into both gears. I went to hacking away at the dog drive carrier. Cut the two lips off it (back one mainly to be able to see the teeth on the output gear) and then sanded the outside that would face the lexan down. A side note on the above. On the two cases there is a small lip on each to provide a tigheter seal. I removed the seal on the case I was working with with the dremel. I suppose it could be called the male. I am still debating if that was a good idea. One pro is more of an area for the lexan to sit down on. Con was more work was needed to get everything to sit below the half case line. Problem that with either way is still getting a real good seal. I might try to use the dremel to carve the female part into the lexan when the new case arrives. Will need to practice carving other wise the cover may look like lines in someones palm. Alright, snow plow just made a pass by the house. Can take an RC out now. Everything fit really well after my initial two holes and some sanding of gears and posts. Well enough that no shims were needed and the gears spun freely and smooth. That wasn't good enough, the more I tried to make it "better", the more shims I neede in the end. I eventually stopped trying to improve it. 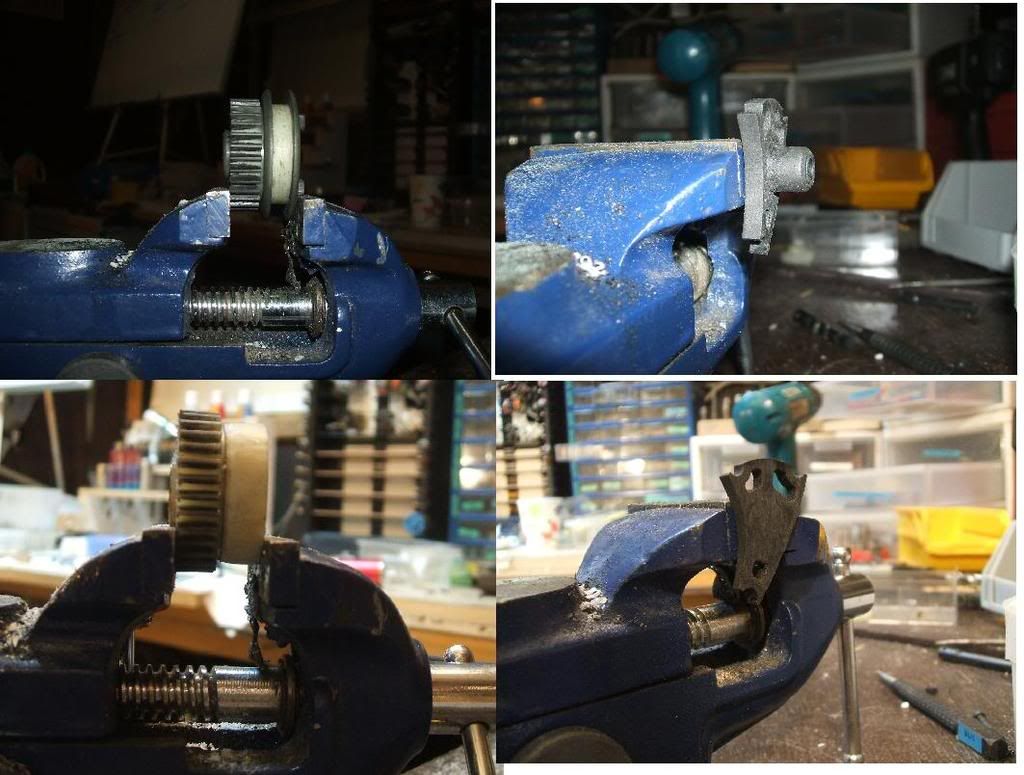 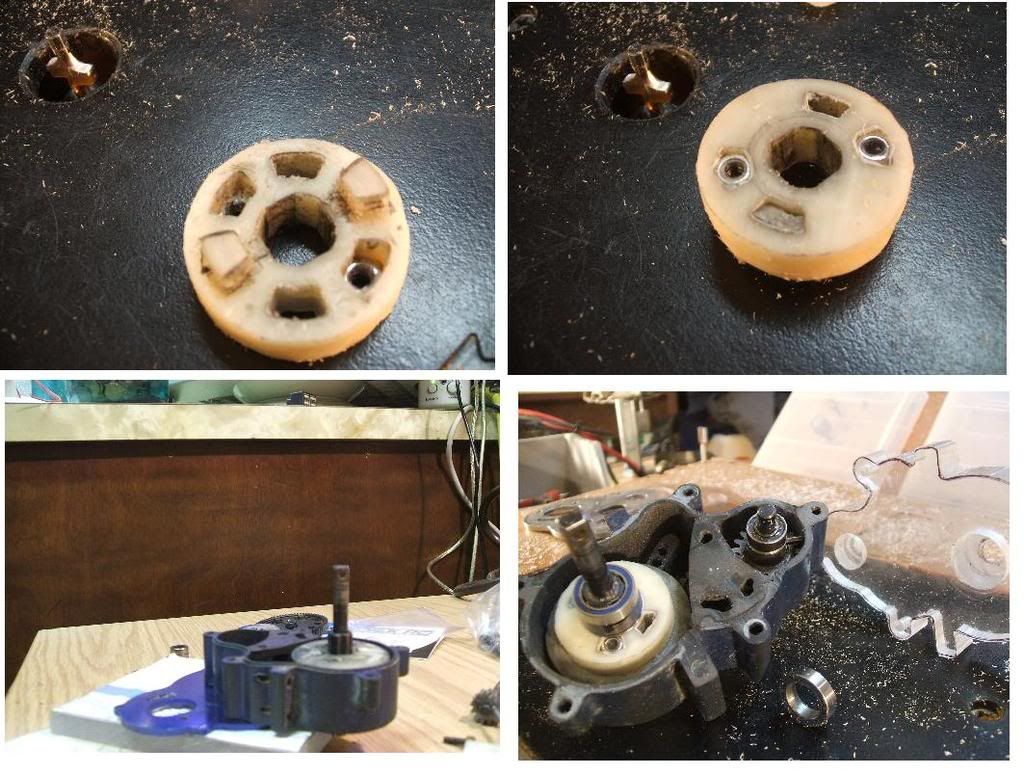 Next I cut out the pattern of the case in the lexan and then trimmed it up with the dremel. I almost cut the pattern out before doing the two holes which I think would of created some problems with the cases edges sitting flush, gears not aligning up right, screw holes off, and a hangover. A little sanding around the edged and then used the dremel router to round off the edge. 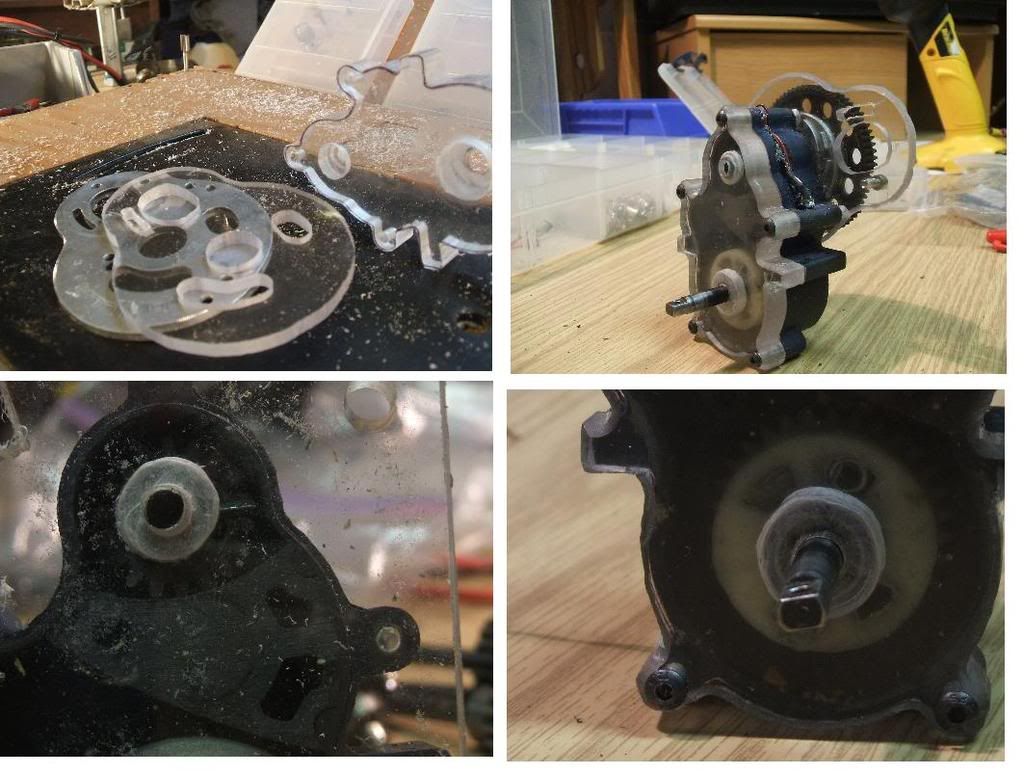 Then the LED light idea came into play. Tried it with red and blue. To me the red looked meaner, more evil. The blue was more cool, smarter. Ended up blue, they were alread soldered and in place. I already solder three up before his set becuase I connected them wrong. It also got tiresome taking the cover off, shimming, cover back on, cover back off, so on and so on. I tried carving a groove for the wires to sit down in. To hide them a little better. If I used just the black wire with a black case it would not stand out as much. The groove ran over the top of the case. Needs some more work for it to be easier on the eyes and hide the wires a little better. I can't hide them under a lexan motor mount. 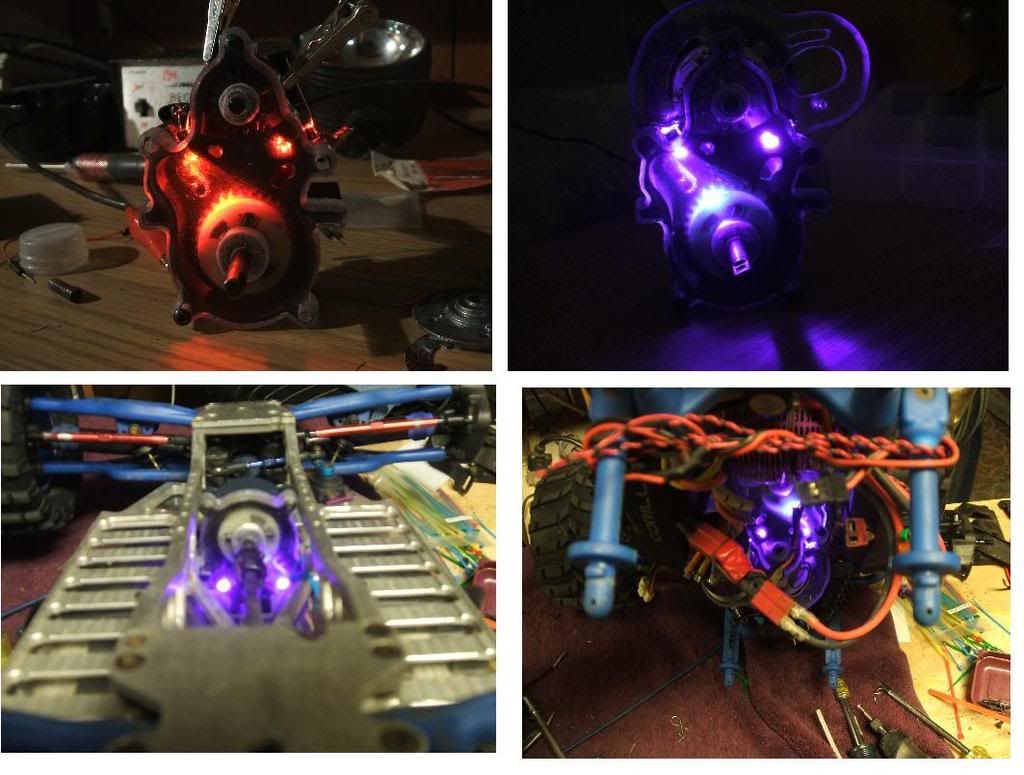 I lightened the midtones up in some of these pictures with it installed in the emaxx. Not so the keen eyes of my fellow RCMers would see I installed the transmission backward or see that I tried to fix it by installing the tires backwards. JK on the tires. That's for better traction in the snow that's on the ground. I lightened them so you could see the emaxx a little it was installed in. When I was removing the tranny to put it in the right way. I thought I would experiment with some reflective aliminum tape. Those are the parting shots for now. I still have some work to do on it. It works just fine. The work is more for appearance and tighter seal around the case then functionality. I have another case on order to play with. 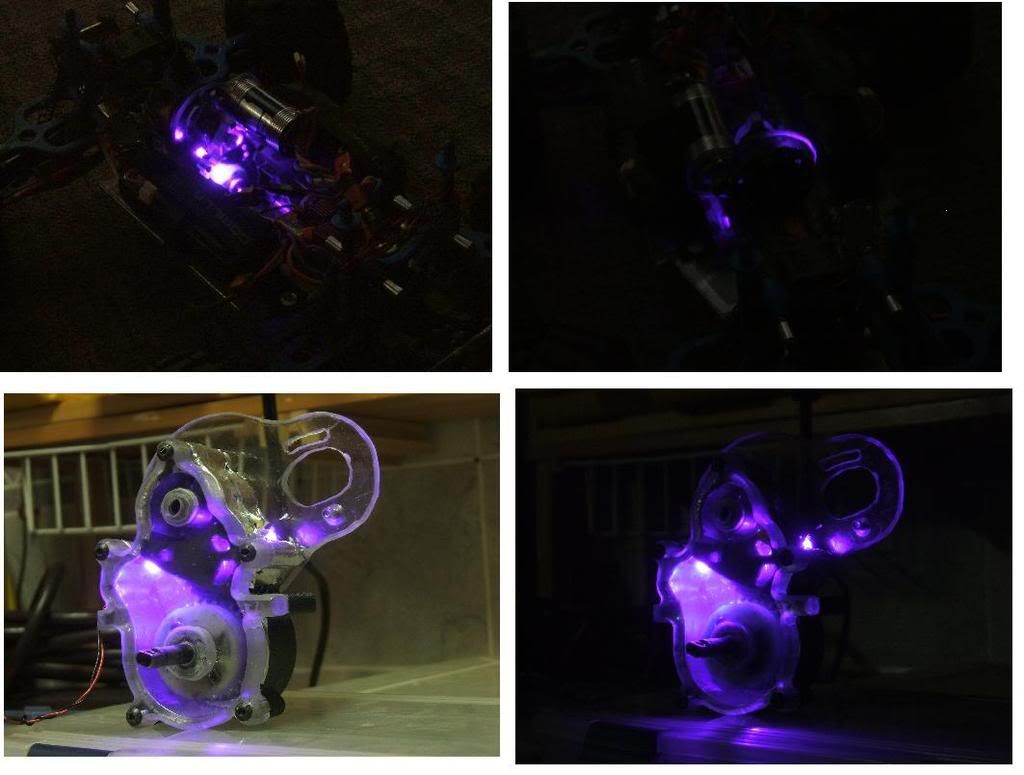 Let's go play in the snow! |
|
|

|
|
|
|
|
(#2)
|
|
RC-Monster Spudgunner
Offline
Posts: 2,353
Join Date: Apr 2008
Location: South Dakota
|
12.25.2008, 07:07 PM
NICE!! That looks sweet!
 One of the best peices of custom work I've seen. |
  |
|
|
|
|
|
(#3)
|
|
Check out my huge box!
Offline
Posts: 11,935
Join Date: Aug 2007
Location: Slidell, LA
|
12.25.2008, 07:57 PM
Where would a sauve guy like myself score some thick ass lexan like that...cheap?
Nice mod, I see a few ways to make it cheaper and easier to do, with the most basic of tools... |
|
|
|
|
|
|
|
(#4)
|
|
A Horse's Ass
Offline
Posts: 1,065
Join Date: Oct 2007
Location: Spokane WA
|
12.25.2008, 09:59 PM
I picked up that stuff of e-bay. There's usually someone selling a chunk the size that you need. What did you have in mind?
|
|
|
|
|
|
|
|
(#5)
|
||
|
RC-Monster Titanium
Offline
Posts: 1,402
Join Date: Aug 2008
Location: Twin Citys Mn
|
12.26.2008, 12:47 AM
cool gee i like the led look
Quote:
Quote:
|
||
|
|
|

|
|
|
|
(#6)
|
|
RC-Monster Carbon Fiber
Offline
Posts: 183
Join Date: Sep 2008
|
12.26.2008, 01:55 AM
Absolutely Astounding
|
|
|
|
Creative. |
|
|
|
(#7)
|
|
JERRY2KONE SUPERMAXX
Offline
Posts: 3,452
Join Date: Sep 2006
Location: HAYMARKET VIRGINIA
|
Creative. -
12.26.2008, 02:16 AM
Like I said once before Gee you have some good creativity. Your design is pretty basic and it seems like any of us should be able to do something like that, but it takes determination and patients to stick with the plan and actually complete the project in such a short time. The only weak point I see is where your bearings are sitting. The area of lexan that was left after your machining process is pretty thin where the bearing seats. You may want to "Gorilla" glue a disk of something over that area to reinforce it, to make sure that it does not break loose on you. I would hate to see all of your work ruined by such a little detail
 . . The LED's are a pretty nice treatment that will get some added attention for your truck when it is in action. Nice work Gee. 
|
|
|
|
|
|
|
|
(#8)
|
|
RC-Monster Carbon Fiber
Offline
Posts: 183
Join Date: Sep 2008
|
12.26.2008, 02:39 AM
Was the REVO style slipper a direct fit ?
Or did you have to modify it ? 
|
|
|
|
|
|
|
|
(#9)
|
|
|
Check out my huge box!
Offline
Posts: 11,935
Join Date: Aug 2007
Location: Slidell, LA
|
12.26.2008, 02:43 AM
Quote:
|
|
|
|
|
|
|
|
|
(#10)
|
|
A Horse's Ass
Offline
Posts: 1,065
Join Date: Oct 2007
Location: Spokane WA
|
12.26.2008, 04:23 AM
It is basically the mod in the first link below to run the revo slipper clutch. Which there are a couple different ways you can get the revo shaft and slipper to work for the 3905 tranny. I didn't use either of the ones that require you to drill a new hole into the shaft. I was able to use the existing holes that were on the revo shaft I ordered.
http://www.rc-monster.com/forum/show...slipper+clutch Yes the 3905 2 speed will work and is a larger and stronger setup in IMO, but there are also mods that need to be done to it. More then the others mods need. Here's a write I did on the 3905 shaft used in the 3906 tranny. http://monster.traxxas.com/showthread.php?t=412386 To go alone with the mod theme, Here's another for using the 3905 steel idlers in the 3906 that I experimented with. They too are a larger gear then the 3906 was made for but they will work. http://monster.traxxas.com/showthread.php?t=412299 Thanks Goerge that area did get thinner as I made it "Better". Will keep an eye on how it wears. It's shimmed well and nothing but a bearing is in contact with it. After some heavy use that could change. A good idea with the gorilla glue and a disk. If my plan works I will have a new and improved cover before that becomes and issue. A few lessons learned while making of this one will make the next on easier and better. The process was easy and the idea was stolen from the G1 tranny. Just went the opposite directions they did and used lexan instead of aluminum. So no creativity on my part just making due with what I had on hand. Plus I had a little spare time while I was waiting for UPS to show up. They were few days behind due to adverse weather conditions. The tools came in handy but if determined you could make one of these with a pocket knife and a lighter to touch up the scuffs. Wouldn't recommend it though. Fostner bits and dremell accessories are not a requirement to start, make, or finish a project. The right tool will make the project easier and allow it to be completed faster. Time is the most valuable item to all of us, we all are always running out of it. We all want more of it. You can't go out an buy more time to have with your children, parents, or spouse. We get paid for our time. There are countless items that are marketed to us to do what. Save us time. Time goes by faster when you get older. Time is running out. Stepping down now. Buy a tool that will speed up your builds and save you time to spend with loved ones. The build is cheap. I already had the 3/8" lexan left over from when I made a rustler out of the stuff. So I can't really say how much that small chunk would of cost. I did buy a new revo shaft thinking I might need it in case mine was bent. That and a couple of bearing and shims. Which are used on other RC too so had those laying around. If you can find some spacers you don't need two of each. Just one on the end for the shaft. I used two cuz they were almost the perfect width needed. Before I got carried away with the dremell. I didn't mention in the picture area that I also removed the blocked area where the shift fork (I believe) went. Been a while since I have had a 2 speed tranny. Was blocking the light. Thanks for the compliment guys. |
|
|
|
|
|
|
|
(#11)
|
|
RC-Monster Carbon Fiber
Offline
Posts: 183
Join Date: Sep 2008
|
12.26.2008, 05:50 PM
Thanks for the ideas Gee
How ´bout 3905 2 speed top shaft in a 3906 ? I want to use the 3905 slipper and idlers and still have a 2 speed gear box
|
|
|
|
|
|
|
|
(#12)
|
|
A Horse's Ass
Offline
Posts: 1,065
Join Date: Oct 2007
Location: Spokane WA
|
12.27.2008, 03:15 AM
SnoopMaxx, I don't know for sure to be honest with you. I haven't messed with a two speed in a real long time. Never had the new 3905 tranny to mess around with or looked at what the two speed conversion they have looks like.
There have been people here at RCM who have successfully drilled a hole in the 3906 shaft and used the revo slipper that way. Mike sells steel idlers here. You don't need to do any mods to get them to fit either. They work great. That might be the best of option for you if you want your cake and eat it too. I had to look over the 3905 shaft thread. http://monster.traxxas.com/showthread.php?t=412386 The first picture in that thread make it look like the gear could be in the right place. You would need to drill the shaft to secure the gear. Again I'd get MIkes idlers and save the the hassle of trying to get those two oversized (wide) idlers in there. First get the shaft and see if the gear will fit on the 3905 shaft in the right place to mesh with the gears first. Good luck and let us know if it works. |
|
|
|
|
|
|
|
(#13)
|
|
RC-Monster Titanium
Offline
Posts: 1,609
Join Date: Aug 2008
Location: Bozeman, Montana
|
12.27.2008, 03:33 AM
Lexan and LEDs, you must be an oldschool case-modder
 Looks awesome with those LEDs in there, makes me miss my LEDs in my computer (new case needs some more bling but I don't have the motivation to pimp my rig). |
|
|
|
|
|
|
|
(#14)
|
|
A Horse's Ass
Offline
Posts: 1,065
Join Date: Oct 2007
Location: Spokane WA
|
12.27.2008, 04:19 AM
Thanks sullie. I've only seen the light of led for about a month now. But they are starting to show up in a lot of my rc lids now. Got one of the truck shells pimped. Sorry linc.
Ignore the fan. That was a joke for BrianG. 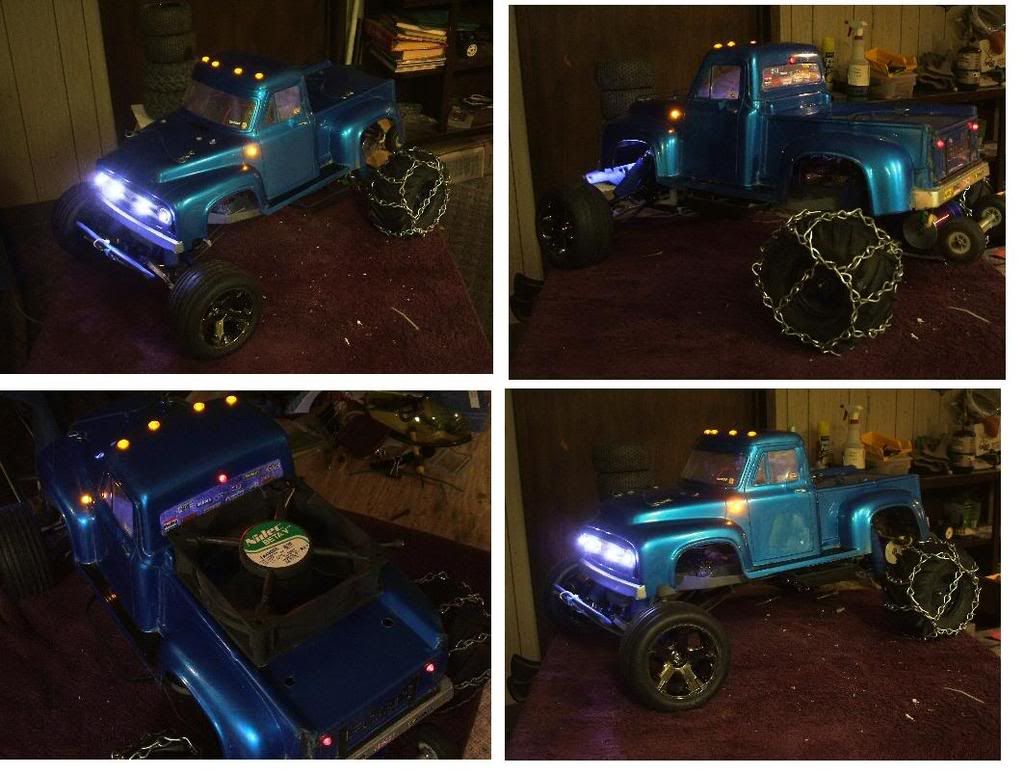
|
|
|
|
Great Prank. |
|
|
|
(#15)
|
|
JERRY2KONE SUPERMAXX
Offline
Posts: 3,452
Join Date: Sep 2006
Location: HAYMARKET VIRGINIA
|
Great Prank. -
12.27.2008, 08:14 AM
 That just made me think how great it would be to prank BrianG by putting a ton of fans all over his 1/1 ride. Wouldn't that be a treat to see the look on his face when he wakes up in the morning and sees like 200 PC fans mounted all over his car. That just made me think how great it would be to prank BrianG by putting a ton of fans all over his 1/1 ride. Wouldn't that be a treat to see the look on his face when he wakes up in the morning and sees like 200 PC fans mounted all over his car. 
|
|
|
|
 |
«
Previous Thread
|
Next Thread
»
| Currently Active Users Viewing This Thread: 1 (0 members and 1 guests) | |

 Hybrid Mode
|
|

Powered by vBulletin® Version 3.8.11
Copyright ©2000 - 2026, vBulletin Solutions Inc.
vBulletin Skin developed by: vBStyles.com
Copyright ©2000 - 2026, vBulletin Solutions Inc.
vBulletin Skin developed by: vBStyles.com