I posted this over at the NitroKillers website and thought it might be useful here too. Anyway...
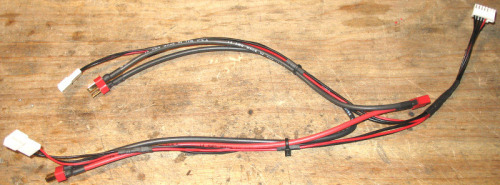
At the request from one of the MaxAmps Admin team, I am creating this thread to explain how to make balancer Y adaptors that will allow you to charge and/or balance two seperate lipo packs as one pack.
This how-to will cover making a 2s+2s adaptor, but the principles are the same for other arrangements like 3s+2s, 3s+3s, 4s+3s, etc. Diagrams for other various lipo pack configurations can be found
here (scroll to the bottom). Also, I will assume you know which tools you will need and how to solder properly.
Lipo Pack Requirements:
Both lipo packs must meet the following guidelines. Failure to do so may result in difficulties in balancing and uneven cell performace characteristics.
- Each pack must have the same capacity. Don't mix two packs with different mAh ratings, such as a 2000mAh pack and a 3000mAh pack.
- Both packs should have always been used together.
- Both packs should be the same age.
- Both packs should have seen the same number of cycles. For example, do not use one pack that has seen 10 charge/discharge cycles with a pack with 20 charge/discharge cycles.
- Both packs should have seen the same type of use. Don't mix one pack that has been used on a low power system with one that has been used on a high power system.
- Both packs must have the same charge level. If you have brand-new packs, it is recommended to balance them together as one pack "off-line" before charging for the first time to make sure all cells start at the same level. "Off-line" means that only the balancer is hooked up with no connection to the charger.
Parts Needed:
Making the Adaptor:
- Lay out both packs and the balancer unit to determine the exact lengths of wires you'll need. Figure in enough wire slack to allow easy placement in a lipo sack, or other fire-resistant container. Try to keep the total length under 2 feet though. Below is a picture of a completed adaptor I made. Note that the charge leads are NOT the same length as the balance leads. This is so the wires connect to the battery packs and my LBA without the stretching or bunching of wires:

- Cut each of the 2s adaptor cables in half. Carefully pull the metal clip and wire out of the large 7 position connector.
- On one of the pack-side connectors, remove the red wire. This is important! This prevents you from burning up a balancer wire if you accidentally hook up the balancer wires wrong. Use an xacto blade tip to gently and slightly lift the little plastic tab holding the metal clip into the connector, then slide the wire out.
- Solder the proper color thin gauge extension wires to the pack-side connector wires. Make sure to keep track of which wire is which!
- Solder one of the metal clip/wires (removed in step 2) to each end of the wire extensions (step 4) using the proper color wire. Now, you should have a pack-side connector on one end, some long wires, and wires with metal clips on the other end.
- Heatshrink all solder connections.
- Insert the metal clip/wires into one of the 7 position connectors in the order as shown in the picture below:

- Make a main charge lead Y harness as shown in the picture below:

- Tie-wrap each "leg" of the main charge lead to the correct "leg" of the balancer connector as shown in the picture below. And yes, it DOES make a difference. This ensures that the proper balancer connector is used when you hook up the main charge leads.

Hope this was clear enough...
The next time I make one of these, I'll snap some pictures of the actual balancer wiring steps.