


|

|
(#16)
|
|
RC-Monster Brushless
Offline
Posts: 2,085
Join Date: Sep 2007
|
12.03.2007, 07:46 PM
I checked the Quark Manual. It was 2.2v per cell that I was setting the cutout at.
They are pretty much done at 2.2v, but yeah at 2.6v, they still have some left.  I'm curious as to how smooth the OEMRC 12s 100amp ESC is and how well it works with the pistix adapter. Have you tried this ESC yet? |
|
|

|
|
|
|
|
(#17)
|
|
RC-Monster Mod
Offline
Posts: 5,297
Join Date: Mar 2005
Location: SoCal
|
12.03.2007, 07:50 PM
Nope, I've only programmed the ESC so far (which is very simple and fast with the programming card). It will be direct soldered to the motor, and since the motor's apart (waiting to have holes drilled in the output shaft), I haven't soldered them together yet.
|
|
|
|
|
|
|
|
(#18)
|
|
RC-Monster Mod
Offline
Posts: 5,297
Join Date: Mar 2005
Location: SoCal
|
12.05.2007, 02:00 AM
So I've made some progress... But not much. I received my order from McMaster-Carr containing the 3 drill bits. After trying all 3, I was able to determine that this shaft is very hard.
But in all seriousness, the steel used is harder than any other steel I have worked with. The 2.5mm carbide drill bit wasn't able to make any progress on it. I have an older 1/8" (3.17mm) carbide-coated drill bit that was able to penetrate, but it is of course a larger diameter than what it should be. All of this was after setting up my cross-slide vice on my drill press table, and setting it all up perfectly and tightening everything up. The use of oil made no difference. (jeez, I don't think I have made so many sexual references in one post) On to the pics:  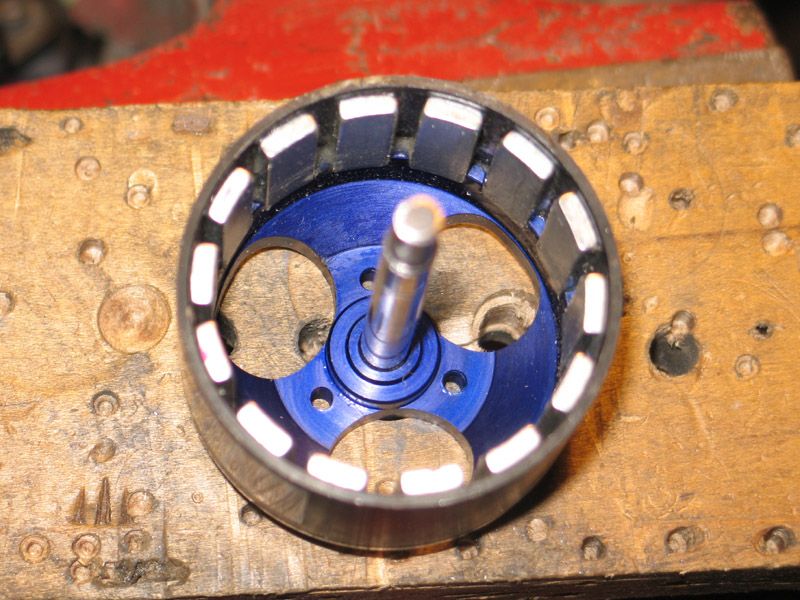 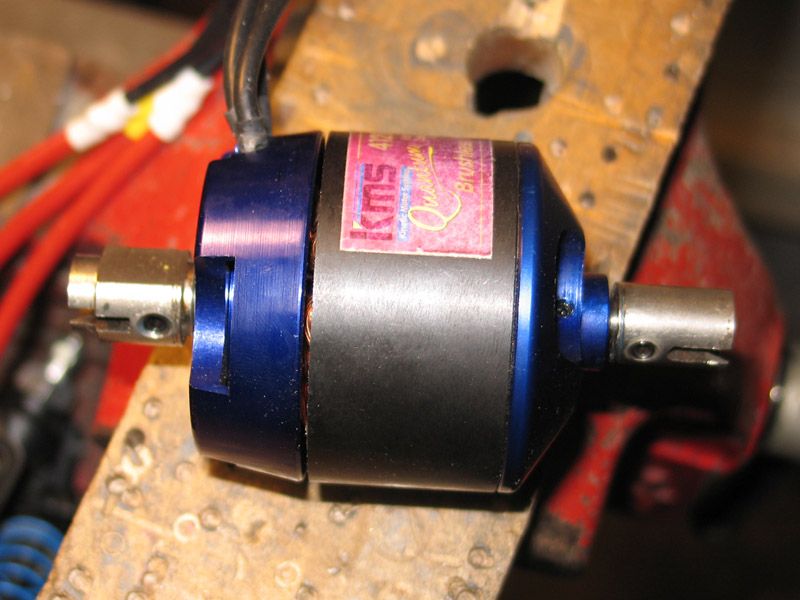 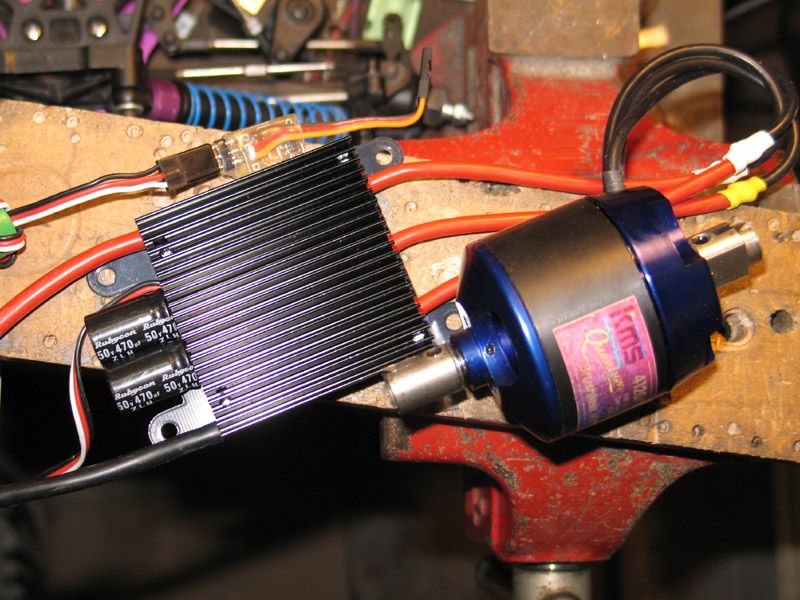 And I also made a vid of the motor running: http://video.google.com/videoplay?do...27213169795459 The black disk I put on is the brake rotor. |
|
|
|
|
|
|
|
(#19)
|
|
BMW M Power!
Offline
Posts: 1,910
Join Date: Jan 2006
Location: SoCal
|
12.05.2007, 02:19 AM
Cool - I look forward to seeing it in person.
CRT .5: 7075 Ext Chassis, LMT1930/7, FP 25C 3S Lipos, MM |
|
|
|
|
|
|
|
(#20)
|
|
RC-Monster Brushless
Offline
Posts: 2,085
Join Date: Sep 2007
|
12.05.2007, 08:42 AM
Yes, I got a strange reaction when I told my GF that I was having trouble working with this hardened shaft!
 That stuff is like bullet proof. There is another way to do it, if you have a cutting torch. You can heat it up Cherry Red, then let it cool off VERY slowly. This removes the temper from the steel. Then it's alot more workable. To restore the temper and regain the hardness in the shaft, (this is an age old question that just recently got answered! ), You heat it back up Cherry Red again. Then you Quench it quickly. I was told to be VERY Careful, because there is a pretty violent reaction, especially if you use water. I was told quenching in Oil works better. If you want to hit the middle of the hardness scale with your shaft, (), you heat it up until it just turns a little brown, then quench it.Well since I was getting this information from my local machine shop, I just opted to order some 6mm shaft material that was of a slighty lesser hardness. Then I made my own custom shafts from that. It worked great. You might take a look at the E maxx output shaft to the transmission. It is 6mm in diameter and already has the "hoe" in it for the cups. LOL Just see if the length is compatible with what you need. Dremel makes a small diamond tipped cutter that will cut the stuff. But it's still a challenge at best. Hmmm, I wonder if the CVD cups and shaft for an E maxx would work? That's the sound of an outrunner alright. I think they are very cool. Very Quiet also. Nice pictures. I like that ESC alot. Can't wait to hear about it's performance in a land vehicle. |
|
|
|
|
|
|
|
(#21)
|
|
RC-Monster Mod
Offline
Posts: 5,297
Join Date: Mar 2005
Location: SoCal
|
12.05.2007, 12:36 PM
For some reason the digital camera didn't really pick up the sound of the outrunner very well. At higher RPMs it sounds like a futuristic ray gun or something (it doesn't sound like that in person).
Only problem with the E-Maxx output shaft is that it's 6mm at the ends (like the Revo is), but the MT2 uses 5mm outputs. Also, I think the E-Maxx output shaft would be too long to fit on the chassis. Good idea though! Sometime I might try that dehardening and rehardening method (with the steel shaft, of course ). But for now the holes are deep enough that there are set screws sitting in them, and it's a very solid fit.
|
|
|
|
|
|
|
|
(#22)
|
|
RC-Monster Aluminum
Offline
Posts: 905
Join Date: Aug 2007
|
12.05.2007, 01:48 PM
Emaxx is 6mm. Tmaxx tranny ouput is 5mm. I just used a tmaxx and emaxx driveshaft on mine, worked like a charm. If it is too long just cut it down.
|
|
|
|
|
|
|
|
(#23)
|
|
RC-Monster Mod
Offline
Posts: 5,297
Join Date: Mar 2005
Location: SoCal
|
12.05.2007, 03:46 PM
We're talking about the output shaft from the transmissions. Without the holes through the outrunner's shaft, I couldn't use the T-Maxx tranny outputs anyways.
|
|
|
|
|
|
|
|
(#24)
|
|
|
RC-Monster Brushless
Offline
Posts: 2,085
Join Date: Sep 2007
|
12.05.2007, 07:41 PM
Quote:
The E maxx output shaft is 67.6mm long. It is 6mm in diameter. If this length is compatible, it's much easier to turn the hard stuff down to 5mm for the drive cup fit, than it is to drill a hole in it. Just put it in a drill press, spin it, and use a file on it or even a Dremel tool. But if you are satisfied with yours already, then it's all good. The set screws should hold just fine with some loctite. Hey JohnRob, You gonna make a thread on your build? I would love to see some pictures. My E Revo is currently waiting on more upgrade parts. 1. 125amp Quark Monster Pro - I will do a small Cap mod to it, mount it with some thermal compound to the Aluminum ESC mount, then I intend to eliminate the 4mm connectors and the extra wire length. I'm going to go right down through the top of the ESC mount to the motor. About 2 inches of wire is all there will be from Motor to ESC, Once I settle on the final motor that is. 2. Castle Creations 10amp BEC. I'm going to make this a permanent fixture for this setup irregardless of what Battery setup I'm running. It's more efficient and takes that much heat further away from the ESC. 3. Custom wound 4130 - I'm still waiting on my 22Ga. 392 degree winding wire to get here. I wanna crank this thing up. I'll make some more Video's too.
|
|
|
|
|

|
|
|
|
(#25)
|
|
|
RC-Monster Mod
Offline
Posts: 5,297
Join Date: Mar 2005
Location: SoCal
|
12.05.2007, 08:37 PM
Quote:
The E-Maxx output shaft, if 67.6mm long, is actually just about the perfect length for the motor. However, it's got that big chunk of metal in the middle, which would take a while to turn down or cut off. |
|
|
|
|
|
|
|
|
(#26)
|
|
|
RC-Monster Brushless
Offline
Posts: 2,085
Join Date: Sep 2007
|
12.05.2007, 08:41 PM
Quote:
You might be surprised how fast this little procedure is. I removed the center "chunks" from two of the Revo Output shafts, fully prepped in about 30 to 45 minutes or so. |
|
|
|
|
|
|
|
|
(#27)
|
|
RC-Monster Carbon Fiber
Offline
Posts: 79
Join Date: Oct 2007
|
12.05.2007, 09:09 PM
Fascinating thread thanks all.
I love that outrunner video- BIZARRE to see the can spinning! Regards David / ICUBoy |
|
|
|
|
|
|
|
(#28)
|
|
|
RC-Monster Mod
Offline
Posts: 5,297
Join Date: Mar 2005
Location: SoCal
|
12.06.2007, 12:52 AM
Quote:
I have some good news - the motor mount is almost finished, and is made out of 1/4" polycarbonate, that was bent to 90* with a heat gun. The brake assembly is finished, and should work adequately. Now I just need to figure out battery mounting, chassis bracing, steering servo mounting, and ESC mounting (this ESC is HUGE). I just wish the MT2 chassis weren't so small. |
|
|
|
|
|
|
|
|
(#29)
|
|
RC-Monster Brushless
Offline
Posts: 2,085
Join Date: Sep 2007
|
12.06.2007, 07:14 PM
Let me know how the Polycarbonate Motor mount works out. I feel like I could have saved some weight with the use of other lightweight materials such as Carbon Fiber.
One desireable trait about Aluminum is it's heat sinking ability.
|
|
|
|
|
|
|
|
(#30)
|
|
RC-Monster Mod
Offline
Posts: 5,297
Join Date: Mar 2005
Location: SoCal
|
12.06.2007, 07:19 PM
I have aluminum angle that would have work just as well as a motor mount, but the polycarbonate is flexible, which will hopefully keep the motor in better shape in case of a crash or whatever (considering the force acting on the motor when it's spinning). That's sort of a problem, because the end of the motor can hit the bottom of the mount when the mount flexes. I think I will brace it, but we'll see.
|
|
|
|
 |
«
Previous Thread
|
Next Thread
»
| Currently Active Users Viewing This Thread: 1 (0 members and 1 guests) | |
| Thread Tools | |
| Display Modes | Rate This Thread |


 Linear Mode

|
|

Powered by vBulletin® Version 3.8.11
Copyright ©2000 - 2026, vBulletin Solutions Inc.
vBulletin Skin developed by: vBStyles.com
Copyright ©2000 - 2026, vBulletin Solutions Inc.
vBulletin Skin developed by: vBStyles.com