


|
|

|

|
(#1)
|
|
|
Guest
Posts: n/a
|
04.09.2009, 04:59 AM
Quote:
Now just to wait the rx8 |
|
|
|

|

|
|
|
|
(#2)
|
|
RC-Monster Carbon Fiber
Offline
Posts: 127
Join Date: Sep 2005
Location: philly
|
04.09.2009, 08:21 AM
just installed mine in a rc8t and street tested it.......niiiiiiiice!!!!!!!!!!!!!!!!!!
can't wait fir practice this weekend |
|
|
|
|
|
|
|
(#3)
|
|
RC-Monster Aluminum
Offline
Posts: 832
Join Date: Jan 2009
|
04.09.2009, 10:26 PM
Anyone race with it in a jamming CRT x1?any review?:)
Hobbywing ManiaRc Acorn racing UpgradeRc Blackbeard RC Team Hong Nor Team RC Monster MoosRacing BocaBearings SweepRacing Tresrey USA |
|
|
|
|
|
|
|
(#4)
|
|
RC-Monster Mod
Offline
Posts: 4,217
Join Date: Apr 2006
Location: Chicago, IL
|
04.14.2009, 01:59 AM
I have been trying to figure out how to get shorter outdrives on the slipperential because they hit the steering servo mount in my 808. Mike mentioned that he thought the HB outdrives might work, but I ust tried them and they didnt. They work on the small cover side, but not on the large cover side. Its just a little to tight to get the cross pin in the hole. Strange that it works on one side but not the other.
What I did make work was the xray diff outdrives, but I had to replace all of the gears inside with the xray gears to make the outdrives work because it uses a different size cross pin thru the outdrive shaft for putting the crown gear on. It also needed to have a bunch of extra shims added to make it work. I used all of the metal washers/shims that came with the slipperential, and then used all of the washers/shims that were in the xray diff too. So basically 2 shims behind each of the 4 satelite gears (1 xray washer and one slipperential washer) and then I put both of the xray washers that go behind the 2 larger crown gears behind the crown gear that went on the small slipperential cover side allong with the washer from the slipperential. (1 slipperential washer behind the crown gear inside the large cover, 2 xray washers and 1 slipperential washer behind the crown gear on the small cover side) I hope all of that makes sense. It seems to be a perfect smooth mesh now. I tried adding more washers to see when it got to tight and if I put more than this in there anywhere the mesh got to tight inside. Heres a quick pic with the shorter xray diff outdrives and the xray internal gears installed. I think it should be good. Not exactly a cheap change to get shorter diff cups, but if you already have an xray then you have all of the parts from the xray diff to make the change. In the 808 you basically need the shorter outdrives because if you use the longer ones the outdrive hits the steering servo mount and you need to take quite a bit off just make enough clearance. Anyway, just though Id post what I found to work. Xray outdrives insatlled with xray gears shimmed up. Slipperential outdrives sitting next to it for length comparison. 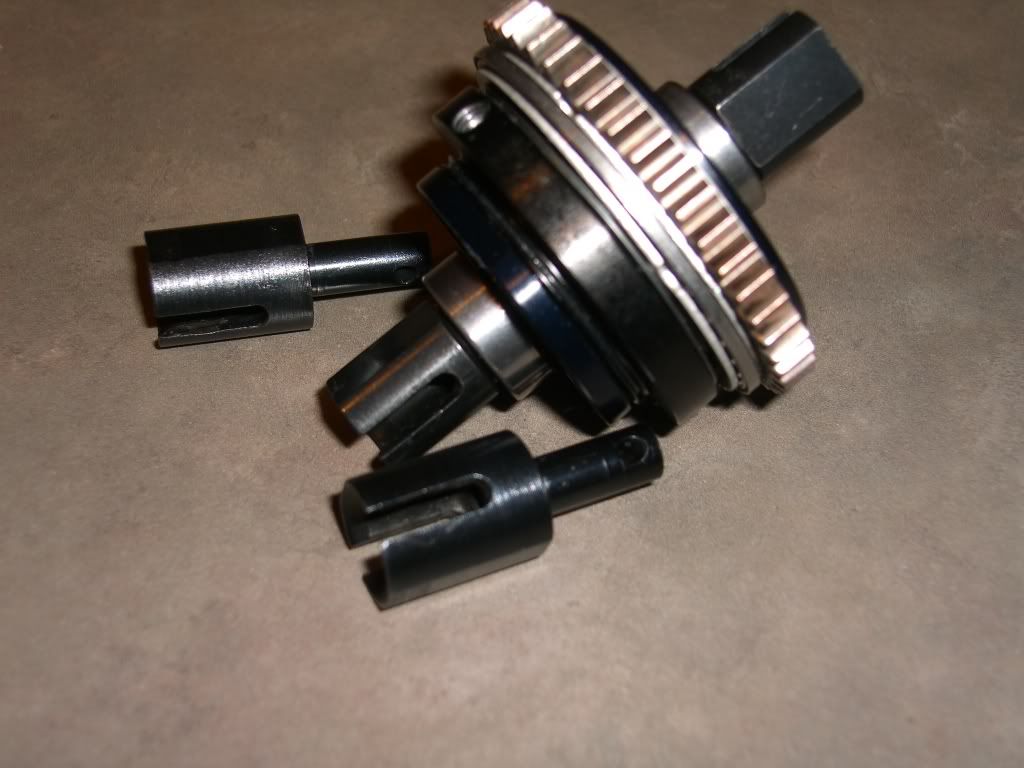
to make it... or break it... Silent...But Deadly |
|
|
|
|
|
|
|
(#5)
|
|
Guest
Posts: n/a
|
04.21.2009, 01:18 PM
Mike, do you have any schedule on when you can have a bracket for the 3905 FLM chassis to work with the Slipperential
  Best Regards E-Maxx Sweden |
|
|
|
|
|
|
|
(#6)
|
|
|
RC-Monster Stock
Offline
Posts: 46
Join Date: Jun 2008
Location: Los Alcázares, Spain
|
04.25.2009, 04:46 PM
Quote:
LT-6S-150 Neu 1515/2.5d/S Zippy-H 6s 4000mAh |
|
|
|
|
|
|
|
|
(#8)
|
|
RC-Monster Titanium
Offline
Posts: 1,025
Join Date: Jan 2007
Location: Prague, Czech Republic
|
04.27.2009, 05:41 PM
BCE MBX5T chassis - had to slightly dremel the spur gear hole, and the nut on the slipperential collar . both by about 0.5mm. 1 minute with dremel.
why the diff has those pesky o-rings inside like mugen diffs do? Most people dont use them anyway :) V4 D8 - RX8, XERUN 4168SD F1-09 - Tekin RS Pro, 17.5t Redline, 2S LiPo Sakura Zero S - LRP, Saturn 20T, 2S LiPo *EX-10 Eurus* |
 |
|
Hey mike. |
|
|
|
(#9)
|
|
JERRY2KONE SUPERMAXX
Offline
Posts: 3,452
Join Date: Sep 2006
Location: HAYMARKET VIRGINIA
|
Hey mike. -
04.28.2009, 07:53 AM
I hope you are still planning to make more mounts for the 3906 as well. I need a few of them for my projects. One for the new Maxxler chassis that Matt is producing, one for my extended FLM Maxx, and one for the extended UE Lightning SuperMaxx that I have setup for high speed testing.
|
|
|
|
|
|
|
|
(#10)
|
|
RC-Monster Titanium
Offline
Posts: 1,025
Join Date: Jan 2007
Location: Prague, Czech Republic
|
04.28.2009, 03:51 PM
what diff oil do you use in truggies for racing? in nitro i used 10k, in my center diff max I had 20k so I put about 17k in mugen and it seem too much. i am bit afraid to go down to 10k.
V4 D8 - RX8, XERUN 4168SD F1-09 - Tekin RS Pro, 17.5t Redline, 2S LiPo Sakura Zero S - LRP, Saturn 20T, 2S LiPo *EX-10 Eurus* |
|
|
|
|
|
|
|
(#11)
|
|
RC-Monster Stock
Offline
Posts: 10
Join Date: Feb 2009
|
10.12.2009, 03:48 AM
Ok, installed it in my Losi 8eight-T and it's almost a drop in.
Only thing that has to be taken care of, at least if you're using Mike's motormount is the fact that the spurgear will be touching the motormount. 3X 0.3mm shimms on the side of the spurgear will solve that problem.  @Mike: My packaging was not damaged in anyway but the 3rd pressure plate was missing. If I understand your instructions right you need 1 pressure plate under the thrustbearing, 1 above, and 1 on the slipper side which need to be roughened a bit to allow for more grip. Used one from my stock but I was wondering if this happened to more packages...  Anyway, it works now and I promptly killed my Castle MMM again....grrr 
|
|
|
|
|
|
|
|
(#12)
|
|
Site Owner
Offline
Posts: 4,915
Join Date: Nov 2004
Location: PA
|
10.13.2009, 10:00 AM
Sorry about the missing pressure plate, Steeni. I am glad you had something similar layong around. The slipper side must be scuffed up a bit and also must be one that is included(they have cutouts that engage the slipper side endcap to prevent it from spinning). The 2 plates on either side of the thrust bearing are to provide a surface for the bearings - any washer in this size is fine here. :)
|
|
|
|
|
|
|
|
(#13)
|
|
|
RC-Monster Stock
Offline
Posts: 10
Join Date: Feb 2009
|
10.13.2009, 12:59 PM
Quote:
But I would say that the scuffing of the pressureplate on the slipperside is a must, the slipperential did overheat badly after roughly 3 minutes on the track before I actually read the instructions again  and saw the remark about the scuffing. and saw the remark about the scuffing.
|
|
|
|
|
|
|
|
|
(#14)
|
|
Site Owner
Offline
Posts: 4,915
Join Date: Nov 2004
Location: PA
|
10.14.2009, 10:16 PM
Yep - the pressure plate is pretty slippery before the scuff procedure. When properly assembled, it works very well and has good adjustemnt resolution. :)
|
|
|
|
|
|
|
|
(#15)
|
|
RC-Monster Mod
Offline
Posts: 2,487
Join Date: Feb 2005
|
10.15.2009, 02:18 AM
BTW, anybody seen the slipperential on rccaraction.com?
It's even in the forum under the "hot news"! Well done, Mike, congratulations. It came a long way, I remember when we first statred to talk about a thing like this, must be a good 4 or 5 years ago now... Daf |
|
|
|
 |
«
Previous Thread
|
Next Thread
»
| Currently Active Users Viewing This Thread: 1 (0 members and 1 guests) | |
| Thread Tools | |
| Display Modes | Rate This Thread |


 Hybrid Mode
|
|

Powered by vBulletin® Version 3.8.11
Copyright ©2000 - 2026, vBulletin Solutions Inc.
vBulletin Skin developed by: vBStyles.com
Copyright ©2000 - 2026, vBulletin Solutions Inc.
vBulletin Skin developed by: vBStyles.com