

New Savage Center Diff ideas...... |

|

|
(#1)
|
|
RC-Monster Carbon Fiber
Offline
Posts: 121
Join Date: Oct 2006
Location: SANDOWN, NH
|
New Savage Center Diff ideas...... -
10.14.2011, 07:08 PM
Well I tore the truck down and sold the Kershaw tranny and 1717 motor. I picked up a 1520 and HB D8T center diff instead.
I have 3 different concepts in my head that I want to try. I'm close to finishing the first one in Solidworks so I thought I would post some pics. I just need to add the shelf for the RX and ESC. Possibly do some weight reduction. - What I don't like about this idea is the center of gravity is very high. - What I do like is the center diff drops out the bottom while the motor and housing stays in place. Pics attached. |
|
|

|
|
|
|
|
(#2)
|
|
RC-Monster Carbon Fiber
Offline
Posts: 121
Join Date: Oct 2006
Location: SANDOWN, NH
|
10.14.2011, 07:08 PM
More pics.
|
|
|
|
|
|
|
|
(#3)
|
|
RC-Monster Stock
Offline
Posts: 29
Join Date: Sep 2011
|
10.14.2011, 10:16 PM
Very cool design, alot nicer than my settup. I take it you'll be using a skid plate of some kind. alot of spur exposed on the bottom
|
|
|
|
|
|
|
|
(#4)
|
|
RC-Monster Carbon Fiber
Offline
Posts: 233
Join Date: Sep 2009
Location: Australia
|
10.14.2011, 10:54 PM
I can drop the center diff out the bottom of my truck and it is a big plus. If you move the motor to the side you will able to get it a lot lower and fit something beside it to help counter balance. My motor still sits a bit across the center line.
Check my build here for ideas http://www.rc-monster.com/forum/showthread.php?t=26870 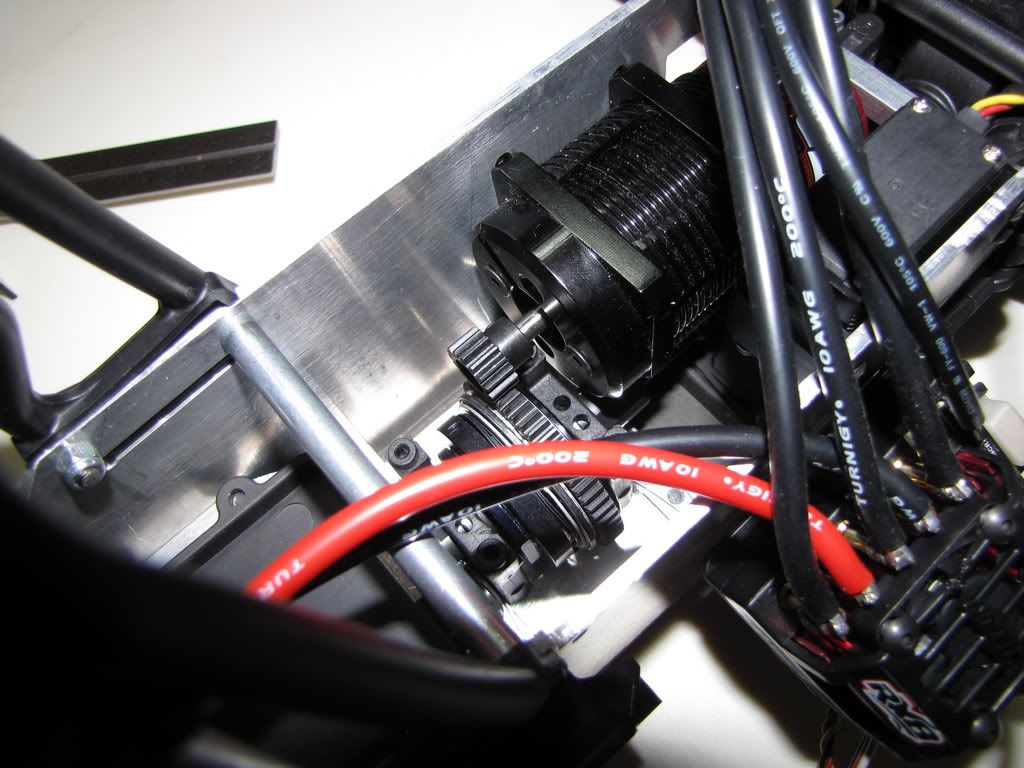
|
|
|
|
|
|
|
|
(#5)
|
|
RC-Monster Carbon Fiber
Offline
Posts: 121
Join Date: Oct 2006
Location: SANDOWN, NH
|
10.15.2011, 10:40 AM
Ya the spur gear does hang lower than I like. It was either that or the motor sits higher. I intentionally designed it using a 50T spur gear so I can always use a smaller one. Plan B was to take one of my RPM skids and see if I can heat it up and form it around the spur. (Or just cut a slot and deal with it)
The second concept is going to move the spur gear higher and hang out the side of the chassis so the motor sits lower and off to the side like _DV's layout. |
|
|
|
|
|
|
|
(#6)
|
|
RC-Monster Carbon Fiber
Offline
Posts: 121
Join Date: Oct 2006
Location: SANDOWN, NH
|
10.15.2011, 10:49 AM
Nice build _dV. I just went through the whole thing. Very clean and solid. I like how you can fit 4s and 6s inside of the tvp's. The slipperential looks a lot smaller than I thought it was.
|
|
|
|
|
|
|
|
(#7)
|
|
RC-Monster Carbon Fiber
Offline
Posts: 233
Join Date: Sep 2009
Location: Australia
|
10.15.2011, 07:18 PM
I was originally concerned about having a cutout in the skid plate for the spur. After countless runs on various terrain though I can safely say it's not a problem. I haven't had a single issue with small rocks being jammed or the spur being damaged(metal spur). I do have a large cutout though due to the slipper being a larger diameter than a normal diff.
One thing that I did notice though is that your diff is an enclosed area. If small rocks get in there the only way they could get out would be through the cutout in the bottom, or if the truck turns upside down. |
|
|
|
|
|
|
|
(#8)
|
|
RC-Monster Carbon Fiber
Offline
Posts: 121
Join Date: Oct 2006
Location: SANDOWN, NH
|
10.15.2011, 10:24 PM
That's a good point^^
I may open that bottom plate up so the diff isn't tightly enclosed. |
|
|
|
|
|
|
|
(#9)
|
|
RC-Monster Stock
Offline
Posts: 29
Join Date: Sep 2011
|
10.16.2011, 07:35 PM
would be cool if someone sold this kind of diff conversion (please correct me if im wrong
 ) )
|
|
|
|
|
|
|
|
(#10)
|
|
RC-Monster Carbon Fiber
Offline
Posts: 121
Join Date: Oct 2006
Location: SANDOWN, NH
|
10.16.2011, 09:26 PM
I think RCM has a universal diff mount that can be integrated. Once I settle on a design I like, I plan on making 5 or 10 of them. It tends to be cheaper that way when you have them machined.
|
|
|
|
|
|
|
|
(#11)
|
|
RC-Monster Stock
Offline
Posts: 29
Join Date: Sep 2011
|
10.16.2011, 11:12 PM
i would be interested for sure. interested to see what you come up with. kinda like the current design though
|
|
|
|
|
|
|
|
(#12)
|
|
RC-Monster Aluminum
Offline
Posts: 765
Join Date: Aug 2007
|
10.17.2011, 03:35 AM
I would be interested in one as well. You have some very good ideas, this would really make this truck alot better.
|
|
|
|
|
|
|
|
(#13)
|
|
RC-Monster Carbon Fiber
Offline
Posts: 121
Join Date: Oct 2006
Location: SANDOWN, NH
|
10.17.2011, 12:54 PM
I'll talk with the moderators on here to make sure I don't step on any toes with selling some extras.
I'm not an approved vendor. |
|
|
|
|
|
|
|
(#14)
|
|
RC-Monster Carbon Fiber
Offline
Posts: 121
Join Date: Oct 2006
Location: SANDOWN, NH
|
10.17.2011, 08:18 PM
Some updated pics:
1. Opened pocket around diff per _dV's suggestions. 2. Slotted hole for motor shaft and reduce diameter to keep dirt out. 3. Added shelf for electronics. 4. Chamfered some sharp edges. 5. Added slots on 2 sides for motor wire routing to ESC. |
|
|
|
|
|
|
|
(#15)
|
|
RC-Monster Carbon Fiber
Offline
Posts: 121
Join Date: Oct 2006
Location: SANDOWN, NH
|
10.17.2011, 08:19 PM
One more pic
|
|
|
|
 |
«
Previous Thread
|
Next Thread
»
| Currently Active Users Viewing This Thread: 1 (0 members and 1 guests) | |
 Linear Mode

|
|

Powered by vBulletin® Version 3.8.11
Copyright ©2000 - 2026, vBulletin Solutions Inc.
vBulletin Skin developed by: vBStyles.com
Copyright ©2000 - 2026, vBulletin Solutions Inc.
vBulletin Skin developed by: vBStyles.com